I’ve tinkered with various ways to generate waveforms for audio attachments in WordPress over the past few years, hoping to find an approach that’s compatible with most hosts. Unfortunately, that rules out server-side software that isn’t generally available on most servers where WordPress is installed.
At one point, I wrote a web service using the WordPress REST API that would accept a file, generate a waveform, and send back a notification when the waveform was ready so the client could download and associate it with the WordPress attachment. Alas, it never went live.
The Web Audio API was an intriguing prospect and there are libraries proving its potential, but it wasn’t widely supported at the time and it has other shortcomings that don’t make it ideal for front end requests.
These days, most browsers implement the Web Audio API, so I thought, “Why not use the browser as an admin tool to generate a waveform in a format that anyone can consume?”
And that’s what this post is about.
Analyzing an Audio File using the Web Audio API to Retrieve Peak Data
To generate a waveform, we first need to analyze an audio file and extract data that can be used to represent the audio. Fortunately, the Web Audio API allows for decoding an audio file into PCM data, which represents the amplitude (loudness) of audio at regular intervals called samples.
| /** | |
| * Load an audio file and decode into PCM data. | |
| * | |
| * @link https://developer.mozilla.org/en-US/docs/Web/API/BaseAudioContext/decodeAudioData | |
| * | |
| * @param {string} url Full URL for an audio file. | |
| * @return {Promise} | |
| */ | |
| function loadAudio( url ) { | |
| return new Promise( ( resolve, reject ) => { | |
| const request = new XMLHttpRequest(); | |
| request.open( 'GET', url, true ); | |
| // Retrieve the audio file as binary data. | |
| // @link https://developer.mozilla.org/en-US/docs/Web/API/XMLHttpRequest/Sending_and_Receiving_Binary_Data | |
| request.responseType = 'arraybuffer'; | |
| request.onload = () => { | |
| audioContext.decodeAudioData( | |
| request.response, | |
| buffer => { | |
| resolve( buffer ); | |
| }, | |
| e => reject( e ) | |
| ); | |
| } | |
| request.send(); | |
| }); | |
| } |
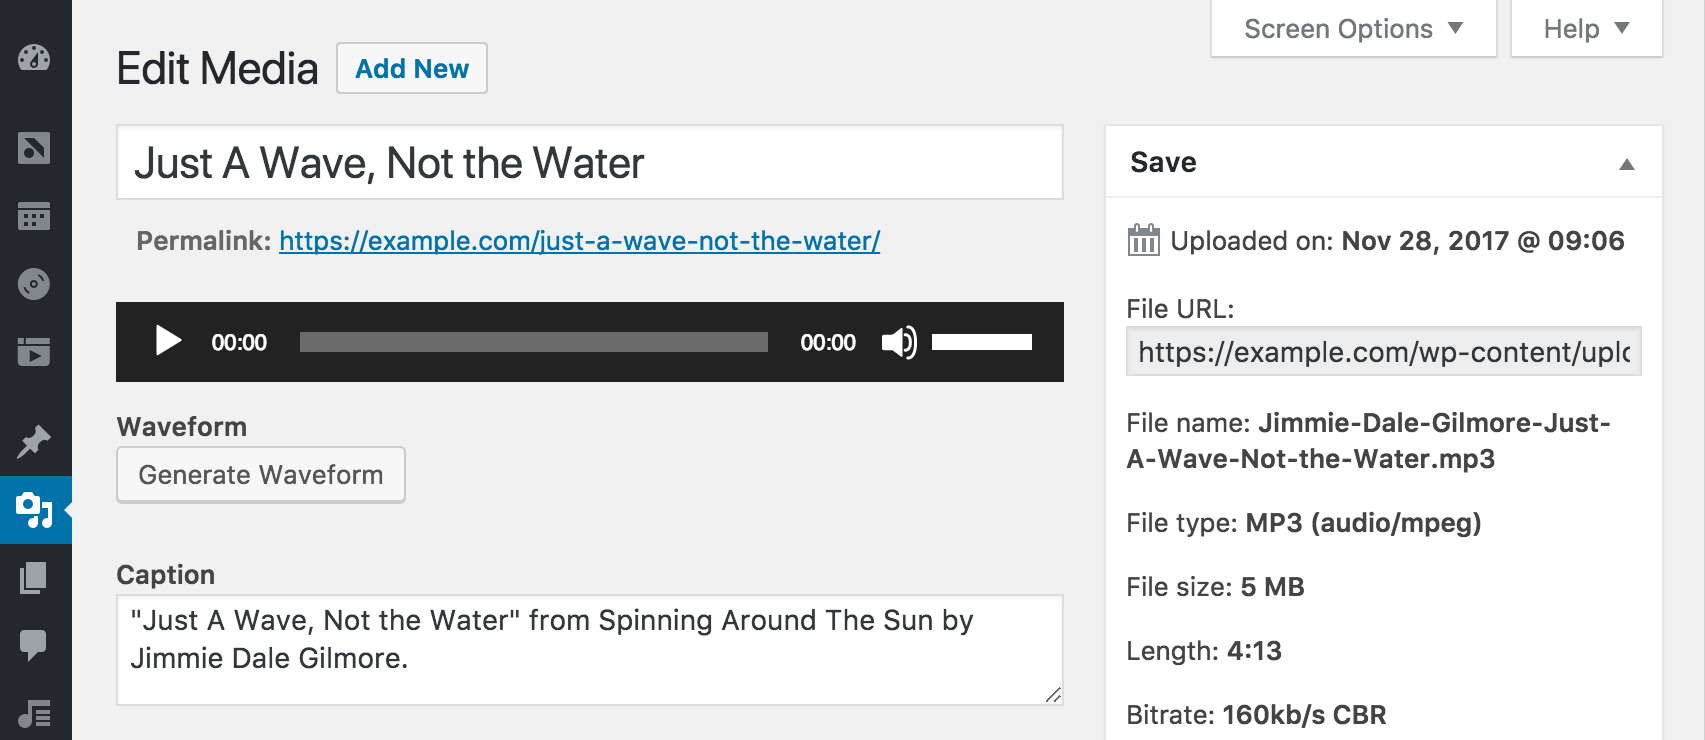
Take Jimmie Dale Gilmore’s “Just a Wave, Not the Water” for example. Assuming a common sample rate of 44.1 kHz, there are 44,100 samples per second of audio. At roughly 4 minutes and 13 seconds long, it clocks in at 11,139,840 samples. Multiply that by two channels and that’s way more data than we can plot on an image.
We need to downsample the audio to fit the size of the waveform we want to generate. For an image 1,800 pixels wide, we’ll divide the total number of samples in the audio by 1,800, which gives us segments that consist of 6,188 samples.
We’ll then loop through each sample in the new segments and find the maximum and minimum amplitude to represent the segment. One other thing the be aware of is the number of channels, so we’ll loop through each channel as well.
| /** | |
| * Downsample and retrieve peaks from an audio buffer. | |
| * | |
| * @param {number} length Number of points to retrieve. | |
| * @param {AudioBuffer} buffer Audio buffer. | |
| * @return {Object[]} Objects with a min and max property. | |
| */ | |
| function getPeaks( length, buffer ) { | |
| const sampleSize = Math.floor( buffer.length / length ); | |
| const numberOfChannels = buffer.numberOfChannels; | |
| const peaks = Array( length ); | |
| for ( let channelIndex = 0; channelIndex < numberOfChannels; channelIndex++ ) { | |
| const channelData = buffer.getChannelData( channelIndex ); | |
| for ( let i = 0; i < length; i++ ) { | |
| const start = parseInt( sampleSize * i, 10 ); | |
| const sample = channelData.slice( start, start + sampleSize ); | |
| const max = sample.reduce( ( a, b ) => a > b ? a : b, 0 ); | |
| const min = sample.reduce( ( a, b ) => a < b ? a : b, 0 ); | |
| peaks[ i ] = peaks[ i ] || { max: 0, min: 0 }; | |
| if ( max > peaks[ i ].max ) { | |
| peaks[ i ].max = max; | |
| } | |
| if ( min < peaks[ i ].min ) { | |
| peaks[ i ].min = min; | |
| } | |
| } | |
| } | |
| return peaks; | |
| } |
What we wind up with is an array of 1,800 objects that represent the top and bottom peaks in the waveform.
Generating a Waveform from Peak Data
There are a number of ways to draw the waveform once the peak data is available. Programmatically generating an SVG is a nice approach because it can be scaled to any size without losing quality and it only takes a few lines of code.
However, since we’re going to be saving the waveform as a WordPress media attachment, we need to generate an image. Fortunately, the HTML Canvas API has some methods that will come in handy, so we’ll draw the waveform to a canvas.
| /** | |
| * Draw a waveform on a canvas. | |
| * | |
| * @param {string|HTMLCanvasElement} el Canvas element or selector. | |
| * @param {AudioBuffer} buffer Audio buffer. | |
| */ | |
| function drawCanvas( el, buffer ) { | |
| const canvas = 'string' === typeof el ? document.querySelector( el ) : el; | |
| const context = canvas.getContext( '2d' ); | |
| const height = canvas.height / 2; | |
| const length = canvas.width; | |
| const peaks = getPeaks( length, buffer ); | |
| const y = value => height - Math.round( value * height ); | |
| context.beginPath(); | |
| context.moveTo( 0, height ); | |
| // Draw the upper path. | |
| for ( let i = 0; i < length; i++ ) { | |
| context.lineTo( i, y( peaks[ i ].max ) ); | |
| } | |
| context.lineTo( length - 1, 0 ); | |
| // Draw the lower path. | |
| for ( let i = length - 1; i >= 0; i-- ) { | |
| context.lineTo( i, y( peaks[ i ].min ) ); | |
| } | |
| context.lineTo( 0, 0 ); | |
| context.fill(); | |
| } |
After drawing the waveform, the canvas can be exported using the toDataURL() method, which produces a data URI for a PNG file. That would be useful, but there’s actually another method I wasn’t familiar with beforehand that will let us export the canvas to raw binary data that can be sent directly to the WordPress REST API.
Saving an HTML Canvas as a Media Attachment using the WordPress REST API
Now that we have the waveform drawn to a canvas, we can export it using the toBlob() method, which creates a Blob object that represents the canvas as a PNG image.
We can pass the blob directly to the WordPress REST API, which will then write it to a file and create a new media attachment. The important thing is to make sure to pass in a Content-Disposition header with a filename. The filename will be used for both the filename and the attachment title.
| /** | |
| * Create a WordPress media attachment. | |
| * | |
| * @param {string} filename Media filename. Also used as the attachment title. | |
| * @param {Blob} blob Raw binary data for the waveform. | |
| * @return {jQuery.Deferred} | |
| */ | |
| function createMedia( filename, blob ) { | |
| return wp.apiRequest({ | |
| path: '/wp/v2/media', | |
| method: 'POST', | |
| contentType: 'image/png', | |
| data: blob, | |
| headers: { | |
| 'Content-Disposition': `attachment; filename="${filename}"` | |
| }, | |
| processData: false | |
| }); | |
| } |
Notice the use of wp.apiRequest() to send the request to the WP REST API. That’s a new utility method added in WordPress 4.9 that automatically adds the X-WP-Nonce header for cookie authentication and allows relative paths to be used for endpoints instead of requiring the full URL. Under the hood, it uses jQuery.ajax() to send the request.
Putting It All Together
With everything in place, we just need to load the audio, draw the waveform on a canvas, and then export the canvas to the media endpoint in the WordPress Rest API:
| const audioUrl = 'https://example.com/Jimmie Dale Gilmore - Just A Wave, Not the Water.mp3'; | |
| loadAudio( audioUrl ) | |
| .then( buffer => { | |
| const canvas = document.querySelector( '#canvas' ); | |
| drawCanvas( canvas, buffer ); | |
| canvas.toBlob( blob => createMedia( 'waveform.png', blob ) ); | |
| }); |
If you’re wanting to see how it all works together, I pushed an experimental plugin to GitHub. After installing and activating the plugin, upload an mp3, then visit the Edit Attachment screen. Under the audio player, you should see a button to generate a waveform.